

GDM runs on 64-bit Windows 10 and Windows 11, and on 64-bit Linux: see On Linux. Builds for macOS are new and still experimental: see On a Mac.
डाउनलोड चुनें
हर संस्करण रिलीज़ पेज पर है। Windows के लिए तीन फ़ाइलें हैं:
| फ़ाइल | यह क्या है |
|---|---|
MisterDownloadManager-<version>-setup.exe |
The installer. Pick this one unless you have a reason not to. It can set up browser integration and open .torrent files and magnet links with GDM. |
MisterDownloadManager-<version>-portable.zip |
एक पोर्टेबल कॉपी। डाउनलोड सूची और सेटिंग्स प्रोग्राम के बगल में एक data फ़ोल्डर में रहती हैं, और रजिस्ट्री में कुछ भी नहीं लिखा जाता है। ब्राउज़र एकीकरण के लिए इंस्टॉलर की आवश्यकता होती है। पोर्टेबल मोड देखें। |
MisterDownloadManager-<version>-x64.zip |
इंस्टॉलर के बिना वही प्रोग्राम। यह अपना डेटा %APPDATA%\misterdownloadmanager में रखता है, जैसे एक स्थापित कॉपी। |
Linux पर
GDM runs on 64-bit Linux with a desktop session. It is tested on Ubuntu 24.04, Debian 12 and
Fedora, with GNOME, KDE Plasma, Xfce and Cinnamon, on X11 and in Wayland sessions. Pick one
of these files (up to version 0.2.4, their names end in -experimental, as in
...-linux-x86_64-experimental.deb):
| फ़ाइल | यह क्या है |
|---|---|
...-linux-x86_64.deb |
For Ubuntu, Debian, Mint and Pop!_OS: sudo apt install ./<file>.deb. It brings the libraries GDM needs. |
...-linux-x86_64.rpm |
For Fedora, openSUSE and RHEL: sudo dnf install ./<file>.rpm. It brings the libraries GDM needs. |
...-linux-x86_64.AppImage |
अधिकांश डिस्ट्रीब्यूशन पर चलता है: इसे निष्पादन योग्य बनाएं (chmod +x) और इसे चलाएं। यह खुद को वहीं अपडेट करता है (सहायता → अपडेट के लिए जाँच करें)। |
...-linux-x86_64.tar.gz |
किसी भी डिस्ट्रीब्यूशन के लिए सादे प्रोग्राम। |
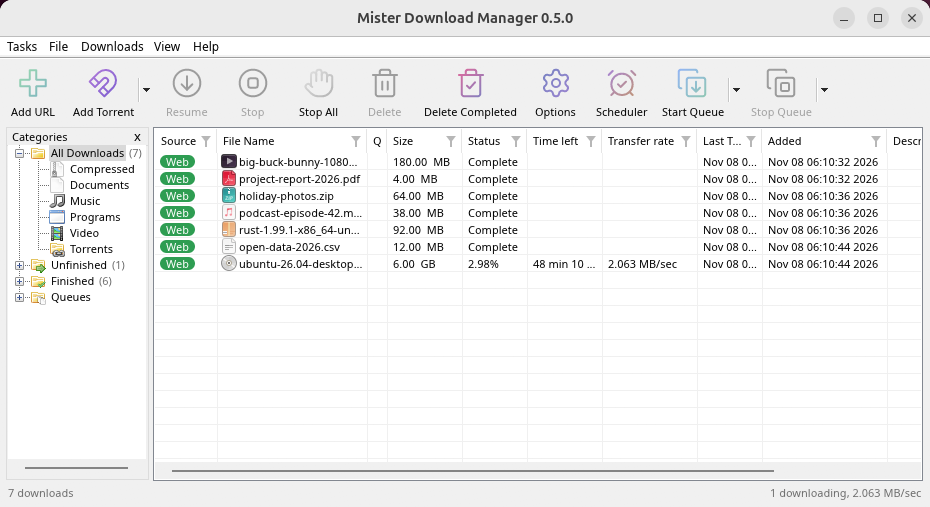
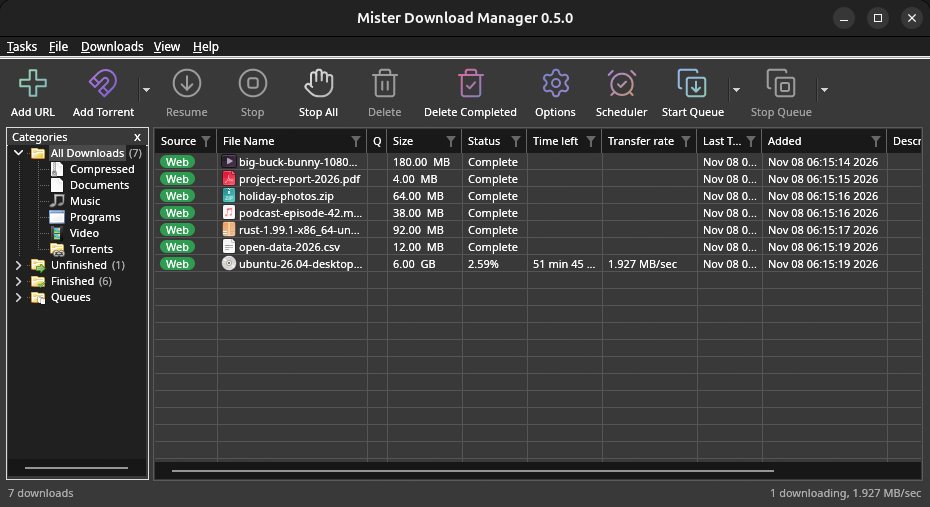
Browser integration is set up by GDM itself at each start (the browsers installed then are found); add the extension as in Browser integration. Firefox installed as a Snap (Ubuntu's) reaches GDM once you allow it; other Snap and Flatpak browsers can't (see Flatpak and Snap browsers). The tray icon, Dark Mode support and Launch on startup work on GNOME (Ubuntu's), KDE Plasma, Xfce and Cinnamon.
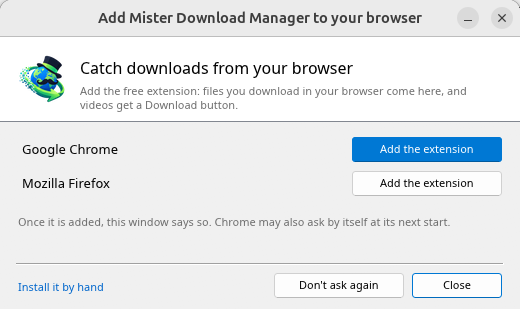
In a Wayland session the windows go through XWayland (below). Not there yet on Linux: screen readers (Orca) don't read GDM's windows; browsers installed as a Flatpak can't reach GDM (Firefox from Flathub may, through the desktop as the Snap does, but that isn't checked yet); and View → Draw with → Vulkan is a choice, OpenGL stays the default.
In a Wayland session (GNOME, KDE Plasma and others), GDM's windows run through XWayland when it is there: Wayland doesn't let a program place its own windows, so GDM's menus and drop-down lists would open in the middle of the screen. To run on Wayland itself anyway, start it with MDM_WAYLAND=1 misterdownloadmanager. If the system lacks a library X11 windows need (such as libxkbcommon-x11, which the .deb and .rpm bring but the AppImage and the tar.gz can't), GDM opens on Wayland instead; with no window system it can use, it names what's missing and the command that installs it.
विंडो वही हैं जो इस सहायता में वर्णित हैं, डेस्कटॉप के फ़ॉन्ट, फ़ाइल आइकन और शीर्षक बार के साथ:
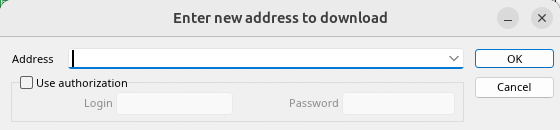
URL जोड़ें। 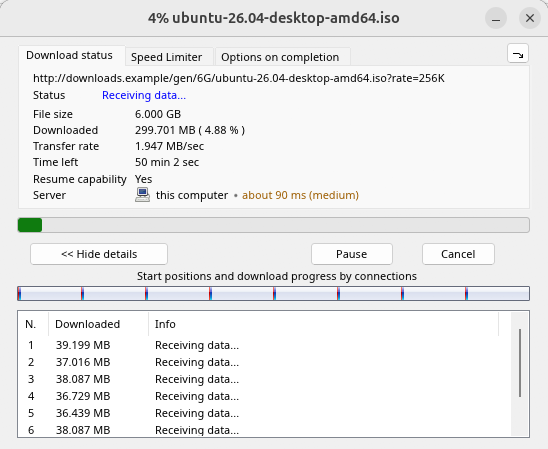
एक डाउनलोड की प्रगति। 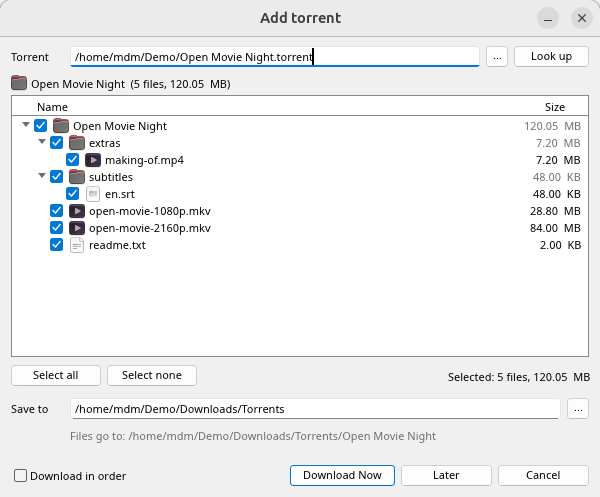
टॉरेंट जोड़ें। 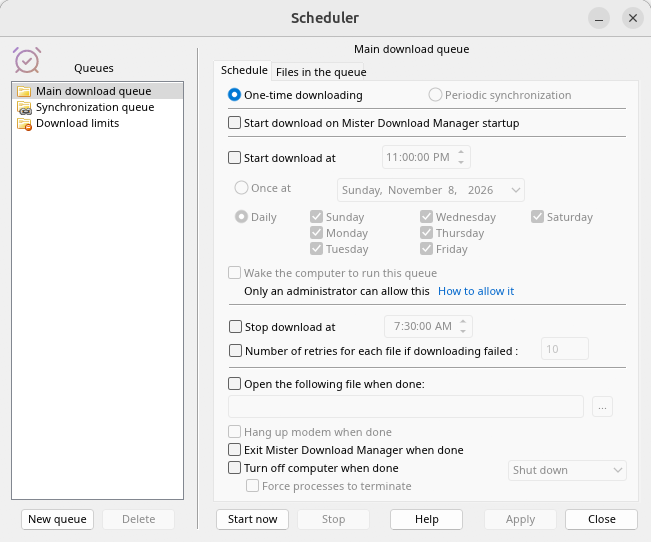
शेड्यूलर। 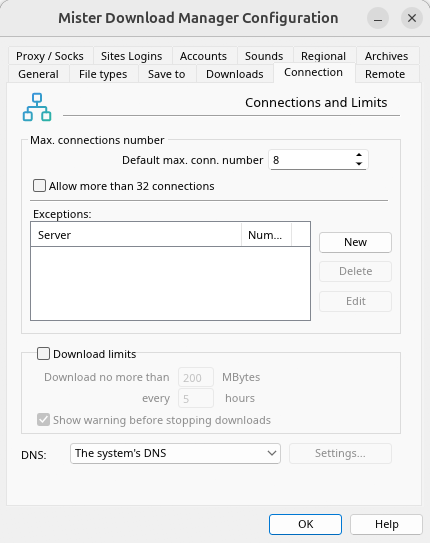
विकल्प।
और अन्य डेस्कटॉप पर इसकी जांच की गई:
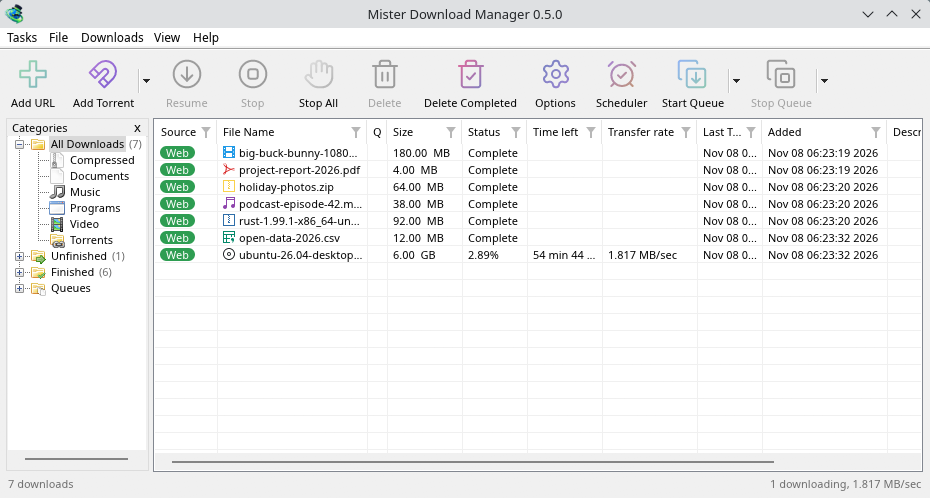
KDE Plasma। 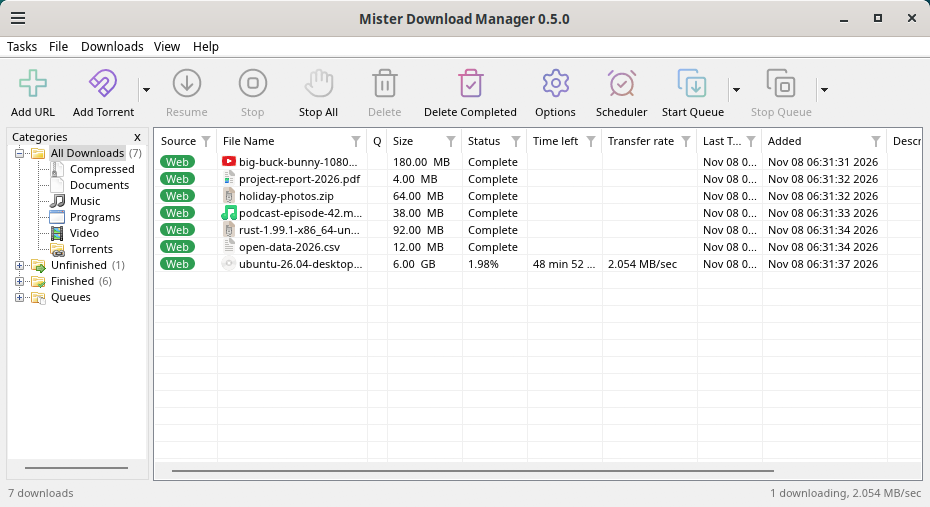
Cinnamon। 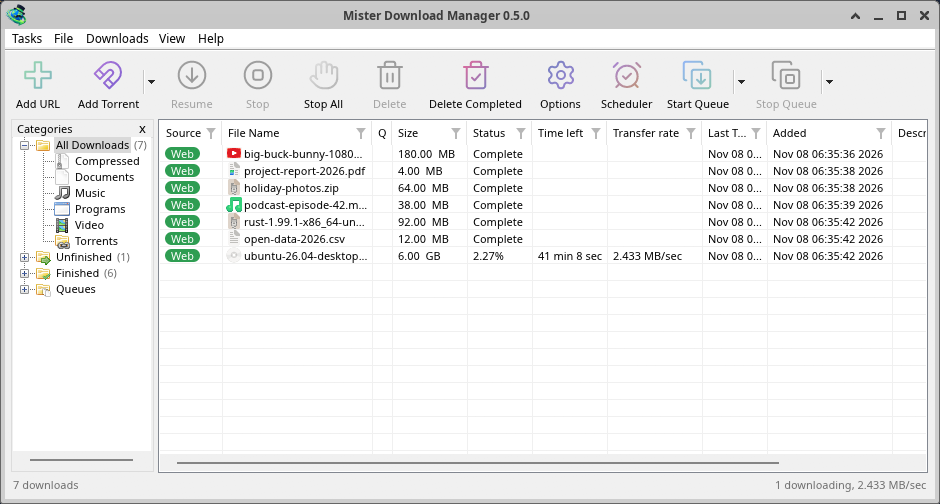
Xfce।
Linux पर अनइंस्टॉल करें
sudo apt remove misterdownloadmanager (or sudo dnf remove misterdownloadmanager) removes the
programs, and the small files that tell your browsers where GDM's helper is: the .deb and .rpm
install those for everyone (in /etc and /usr/lib), for Chrome, Chromium, Edge, Brave, Vivaldi
and Firefox (the Snap too), so GDM doesn't write them in your home folder. For the AppImage or the
tar.gz, delete the file or the folder.
What GDM keeps in your home folder stays, as with any package: your list and settings
(~/.local/share/misterdownloadmanager), the AppImage's and the tar.gz's browser files, and
those of the browsers that read them only there (Opera, Helium, Thorium, and Firefox's forks:
Zen, LibreWolf, Floorp, Waterfox). A package can't remove those: it never touches
home folders. Without GDM they lead nowhere, so the extension says it can't reach GDM. To remove
them as well, run this as each user who used GDM, before uninstalling:
misterdownloadmanager-nmhost --unregister
(AppImage से: ~/.local/share/misterdownloadmanager/browser-host/misterdownloadmanager-nmhost --unregister।) पहले ही अनइंस्टॉल कर दिया गया है? यह वही फ़ाइलें हटाता है:
find ~/.mozilla ~/.librewolf ~/.config -name com.misterdownloadmanager.host.json -delete 2>/dev/null
Mac पर
macOS बिल्ड नए और अभी प्रायोगिक हैं: हमने उन्हें अभी तक खुद Mac पर नहीं आज़माया है, इसलिए आप पहले लोगों में से होंगे। कृपया हमें बताएं कि यह कैसा रहा, अच्छा या बुरा।
| फ़ाइल | यह क्या है |
|---|---|
...-macos-arm64-experimental.dmg |
For a Mac with Apple Silicon (M1 or later: Apple menu → About This Mac shows a Chip). Open it and drag GolinksPRO Download Manager to Applications. macOS asks before its first start, because the app isn't notarized by Apple: right-click it and choose Open (on macOS 15 and later: System Settings → Privacy & Security → Open Anyway). |
...-macos-x86_64-experimental.dmg |
Intel प्रोसेसर वाले Mac के लिए भी यही प्रक्रिया है (इस Mac के बारे में में प्रोसेसर दिखता है)। |
Browser integration is set up by GDM itself at each start (the browsers installed then are found); add the extension as in Browser integration.
सेटअप के साथ इंस्टॉल करें
MisterDownloadManager-<version>-setup.exeचलाएँ।- Choose the language. Windows' display language is already selected. The setup offers every language GDM has, and GDM starts in the one you pick.
- चुनें कि केवल आपके लिए इंस्टॉल करना है या कंप्यूटर पर सभी के लिए। केवल आपके लिए किसी व्यवस्थापक अधिकारों की आवश्यकता नहीं है और
%LOCALAPPDATA%\Programs\GolinksPRO Download Managerमें जाता है। सभी के लिएProgram Filesमें जाता है। - Pick what the setup should do: - Set up browser integration (Chrome, Edge, Brave, Firefox) - Open .torrent files and magnet links with GolinksPRO Download Manager - Start GolinksPRO Download Manager when Windows starts - Create a desktop shortcut (off unless you tick it)
- Click Install, then Finish to start GDM.
If GDM is already running, the setup asks it to save and close first. To update, use Help → Check for updates → Update now, or run the setup of the new version; your list and settings stay.
ब्राउज़र इंटीग्रेशन के लिए हर ब्राउज़र में एक और कदम की ज़रूरत होती है: एक्सटेंशन जोड़ना। Firefox में, addons.mozilla.org पर इसके पेज पर Firefox में जोड़ें पर क्लिक करें; Chrome, Edge, Brave, Opera और Vivaldi में, Chrome वेब स्टोर में इसके पेज पर Chrome में जोड़ें पर क्लिक करें। ब्राउज़र इंटीग्रेशन बताता है कि यह कैसे करें।
अनइंस्टॉल करें
Uninstall GDM from Windows Settings → Apps. The uninstaller asks whether to delete your download list and settings too. Your downloaded files are never touched.
एक ज़िप कॉपी का उपयोग करें
- फ़ाइल को ऐसे फ़ोल्डर में अनज़िप करें जहाँ आपको लिखने की अनुमति हो (सीधे
Program Filesमें नहीं)। misterdownloadmanager.exeचलाएँ।
ज़िप में सेटअप वाले ही प्रोग्राम होते हैं: ऐप, misterdownloadmanager-cli.exe (कमांड लाइन से डाउनलोड करने के लिए; कमांड लाइन और ऑटोमेशन देखें) और extension फ़ोल्डर।
पहली बार शुरू करना और भाषा
- Installed with the setup: GDM starts in the language you chose in the setup.
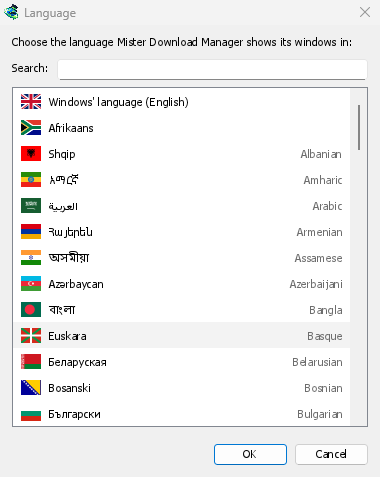
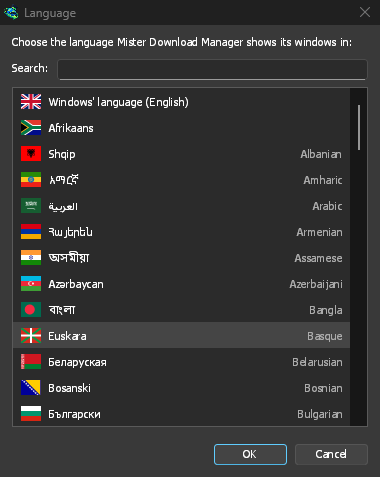
- Otherwise: GDM shows the list of languages, each with its flag and its own name. Pick yours.
आप इसे किसी भी समय देखें → भाषा में बदल सकते हैं। भाषाएँ में और जानें।
वीडियो के सहायक प्रोग्राम
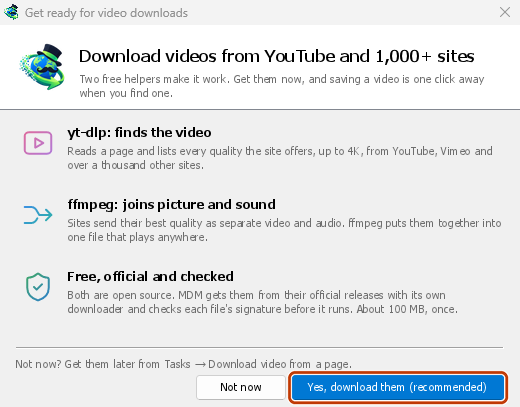
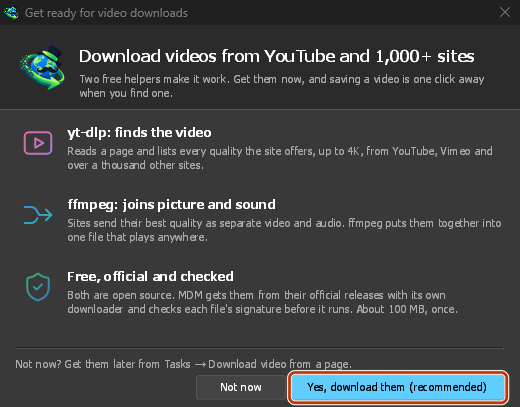
Next, GDM offers its two free video helpers: yt-dlp, which finds the video on a page, and ffmpeg, which joins its picture and sound. Click Yes, download them (recommended) and they download in the background, about 100 MB, once. Not now leaves them for later: the video window offers them when you first need them. More in Videos.
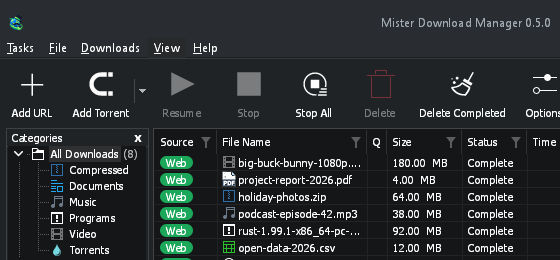
मुख्य विंडो
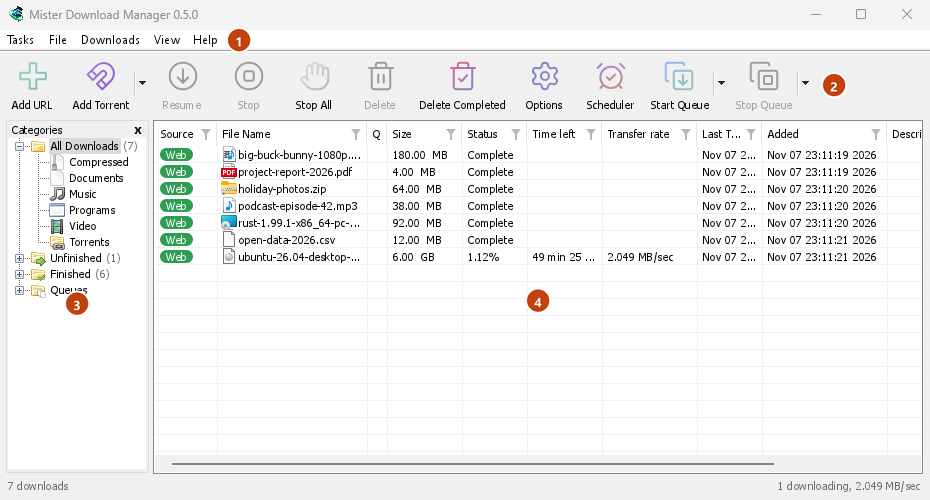
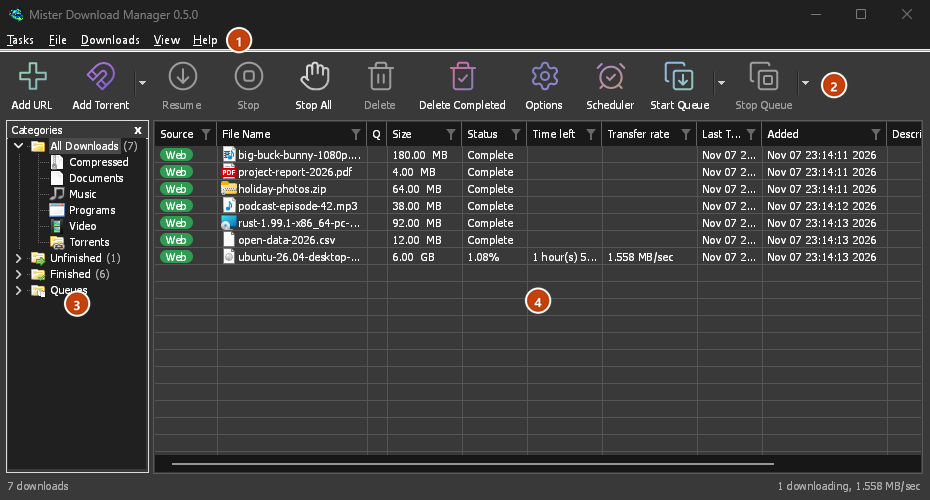
ऊपर से नीचे तक:
- मेनू बार।
- कार्य — डाउनलोड, टॉरेंट, मैग्नेट लिंक, बैच डाउनलोड और एक पेज से वीडियो जोड़ें; टॉरेंट सेटिंग्स; लिंक ग्रैबर; RSS फ़ीड; ड्रॉप टारगेट दिखाएं; सूची आयात और निर्यात करें; बाहर निकलें।
- फ़ाइल — चुने गए डाउनलोड के लिए: डाउनलोड रोकें, हटाएँ, अभी डाउनलोड करें, फिर से डाउनलोड करें।
- डाउनलोड — सभी रोकें, सभी रोकें, सभी पूर्ण हुए मिटाएँ, खोजें, शेड्यूलर, कतारें, गति सीमित करने वाला और विकल्प।
- देखें — श्रेणियां दिखाएं या छिपाएं, सूची को सॉर्ट करें (फ़ाइलें व्यवस्थित करें), डार्क मोड समर्थन, हमेशा गहरा, थीम, इंटरफ़ेस आकार (प्रत्येक विंडो बड़ी, 100% से 200%; Ctrl +, Ctrl − और Ctrl 0 भी), इसके साथ ड्रा करें (OpenGL, या Windows पर Direct3D, Linux पर Vulkan, macOS पर Metal) और भाषा।
- Help — help pages and tutorials (on the website, in your language when it has it), Keyboard shortcuts, Report a problem, Check for updates, About, Tell a friend and Support GDM (its creator's GitHub Sponsors page: optional, nothing in GDM changes).
- टूलबार। URL जोड़ें, टॉरेंट जोड़ें, फिर से शुरू करें, रोकें, सभी रोकें, हटाएँ, पूर्ण किए गए हटाएँ, विकल्प, शेड्यूलर, कतार शुरू करें, कतार रोकें। टॉरेंट जोड़ें, कतार शुरू करें और कतार रोकें के पास का छोटा तीर और विकल्प खोलता है।
- श्रेणियाँ (बाईं ओर)। चुनें कि सूची में क्या दिखे: सभी डाउनलोड, अधूरे, पूर्ण और कतारें, जिनमें से हर एक की अपनी श्रेणियाँ हैं। फलक और सूची के बीच की जगह खींचकर उसे चौड़ा करें।
- डाउनलोड सूची (दाईं ओर)। हर डाउनलोड के लिए एक पंक्ति। डाउनलोड सूची देखें।
डार्क मोड
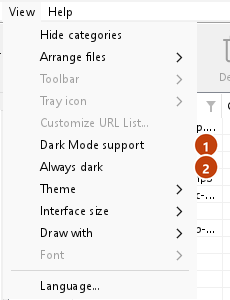
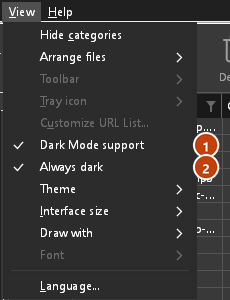
GDM follows your system: when Windows (or your desktop's light/dark preference on Linux and macOS) is set to dark mode, so is GDM. To keep GDM light whatever the system does, turn off View → Dark Mode support. To keep it dark whatever the system does, for example on a desktop that reports no preference, turn on View → Always dark.
थीम
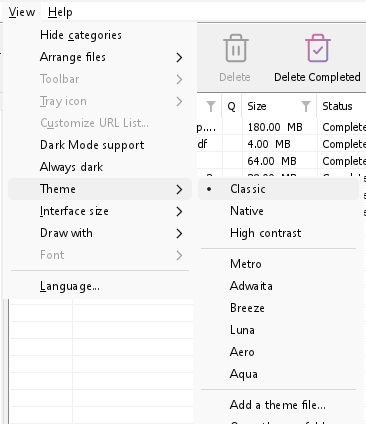
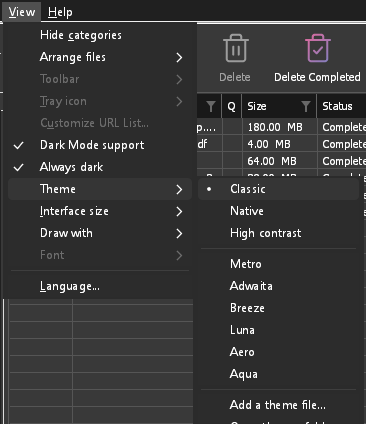
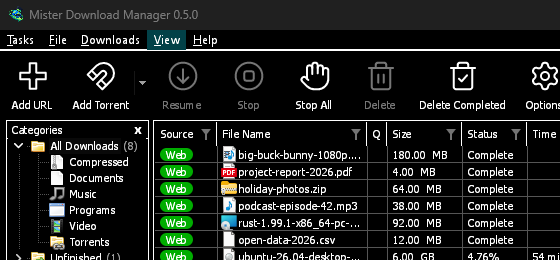
View → Theme changes GDM's look at once, keeping its layout:
- Classic: GDM's own look, the default.
- नेटिव: आपके सिस्टम के रंग। Windows का एक्सेंट रंग (सेटिंग्स → पर्सनलाइज़ेशन → रंग) और, चालू होने पर, उसकी कंट्रास्ट थीम; Linux पर डेस्कटॉप का एक्सेंट रंग और उच्च कंट्रास्ट सेटिंग (GNOME 47 और बाद के संस्करण, KDE Plasma); macOS पर एक्सेंट रंग। इनके बदलने पर GDM भी उनके अनुसार बदलता है।
- उच्च कंट्रास्ट: काला और सफ़ेद रंग, चमकीला एक्सेंट रंग, हर किनारे की स्पष्ट रेखा और 7:1 या उससे अधिक कंट्रास्ट वाला टेक्स्ट।
- Metro: Windows 8's flat look: square corners, flat buttons and boxes, a coloured title bar with the title centred (on Windows, where GDM draws it), and one-colour icons (Microsoft's Fluent UI System Icons).
- Adwaita: GNOME's look: round corners, flat grey buttons, a rounded focus ring, GNOME's check boxes, a header bar with the title in bold and round buttons (on Windows, where GDM draws it), and GNOME's Adwaita icons, in colour for files and categories, one colour in the toolbar.
- Breeze: KDE Plasma's look: rounded corners, buttons and boxes that take the accent's edge under the pointer or when focused, KDE's check boxes and focus frame, KDE's title bar with the title centred and round buttons (on Windows, where GDM draws it), and KDE's Breeze icons.
- Luna: Windows XP's look: buttons shaded from white with an orange glow under the pointer, green ticks, square text boxes, progress in green blocks, a deep blue title bar with the title in bold (on Windows, where GDM draws it), and colourful icons drawn for GDM in that manner.
- Aero: Windows 7's look: glossy buttons that turn light blue under the pointer, quiet check boxes, a glossy green progress bar, a glassy title bar with the title on a soft glow (on Windows), and glossy icons drawn for GDM in that manner.
- Aqua: Mac OS X's look: gel buttons round at the ends (the default one blue), glossy check boxes, a blue focus ring, a blue gel progress bar, a grey title bar with small round buttons (on Windows), and icons drawn for GDM in that manner.
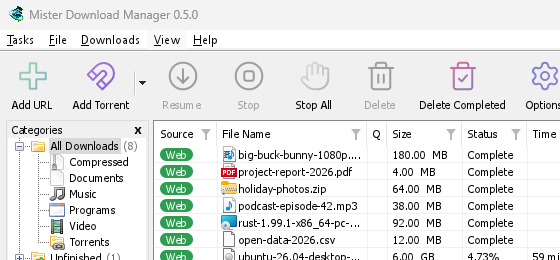
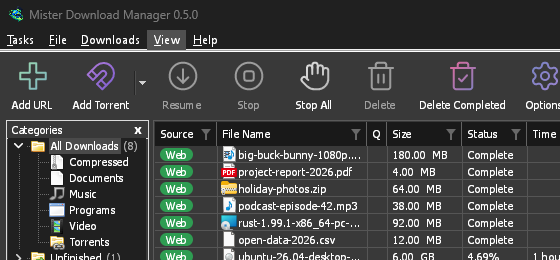
क्लासिक 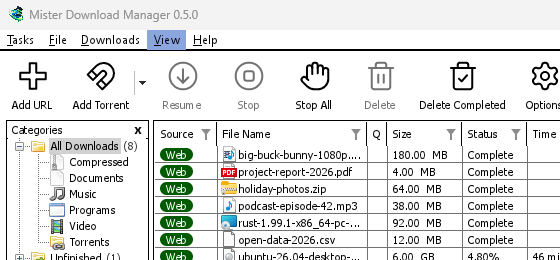
उच्च कंट्रास्ट 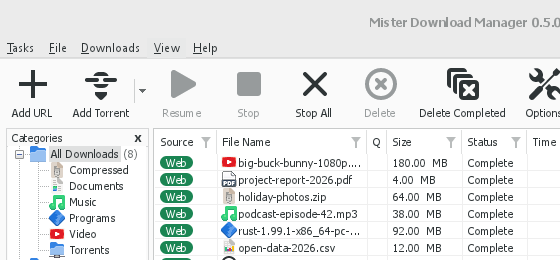
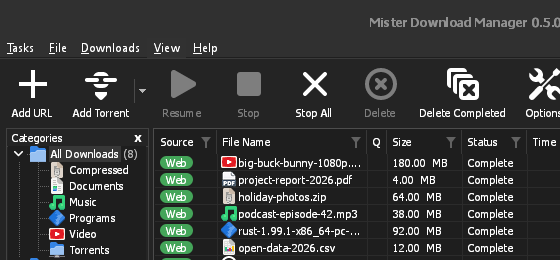
Adwaita 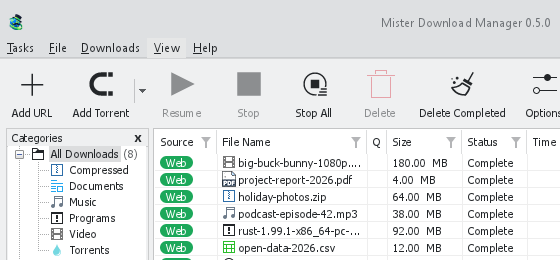
Breeze
प्रत्येक का एक हल्का और एक गहरा पक्ष होता है: डार्क मोड समर्थन और हमेशा गहरा पहले की तरह उनमें से चुनते हैं। थीम फ़ोल्डर में रखी गई थीम फ़ाइलें (देखें → थीम → थीम फ़ोल्डर खोलें) भी वहाँ सूचीबद्ध होती हैं, और Base16 और pywal कलर स्कीम भी (देखें → थीम → थीम फ़ाइल जोड़ें…; pywal चलते समय wal का अनुसरण करता है): थीम बताता है कि वह फ़ोल्डर कहाँ है, एक थीम फ़ाइल में क्या होता है (inherits, रंग, आकार, नियंत्रण आकार, आइकन), एक स्कीम के रंगों का उपयोग कैसे किया जाता है, और एक कैसे बनाया और साझा किया जाए।
ट्रे आइकन
Closing the main window doesn't quit GDM. It hides in the notification area, and downloads, queues and schedules carry on. To make closing quit (a portable copy's folder can then be deleted), untick Options → General → Keep running when closing the window. If there is no icon for GDM at all — not in the notification area, nor behind the ^ hidden icons — the window minimizes to the taskbar instead, so downloads continue and there is a way back. An icon behind ^ can be clicked to bring the window back, and starting GDM again always does.
On Linux this needs a tray, which most desktops have (KDE Plasma, Xfce, Cinnamon, Ubuntu's GNOME or GNOME with the AppIndicator extension, waybar's tray). On a desktop without one (some tiling window managers), closing the window quits GDM, since there would be nowhere to bring it back from.
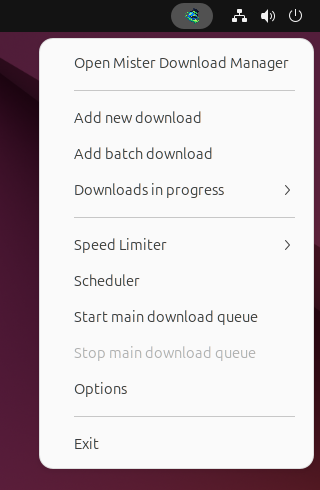
- विंडो को वापस लाने के लिए ट्रे आइकन पर क्लिक करें।
- इस पर राइट-क्लिक करके नया डाउनलोड जोड़ें, बैच डाउनलोड जोड़ें, प्रगति में डाउनलोड, गति सीमित करने वाला, शेड्यूलर, मुख्य डाउनलोड कतार, विकल्प और बाहर निकलें खोलें।
- प्रगति में डाउनलोड में चल रहे डाउनलोड की सूची दिखती है। उसकी प्रगति विंडो देखने के लिए कोई डाउनलोड चुनें।
जब सूचना क्षेत्र में छोटा करें विकल्प → सामान्य में चालू होता है, तो छोटा करें मुख्य विंडो को वहीं छिपा देता है। यह डिफ़ॉल्ट रूप से चालू होता है; जहाँ ट्रे में कोई आइकन नहीं होता, वहाँ छोटा करें विंडो को टास्कबार में भेज देता है।
डाउनलोड की प्रगति विंडो को भी वहाँ भेजा जा सकता है। इसके लिए छोटा करें बटन या सूचना क्षेत्र में छिपाएँ बटन का उपयोग करें। यह बटन कोने की ओर नीचे जाता हुआ तीर और छोटी डैश के रूप में दिखता है।
Windows पर यह बटन विंडो की शीर्षक पट्टी में, छोटा करें बटन के बाईं ओर और शीर्षक पट्टी के मेनू (Alt+Space) में होता है। Linux और macOS पर यह टैब पंक्ति के अंत में होता है।
विंडो वापस लाने के लिए, प्रगति में डाउनलोड में उस डाउनलोड को चुनें या सूची में उस पर डबल-क्लिक करें।
बाहर निकलने के लिए, ट्रे मेनू में कार्य → बाहर निकलें या बाहर निकलें चुनें।
Where GDM keeps its data
डाउनलोड सूची और सेटिंग्स %APPDATA%\misterdownloadmanager (downloads.json) में हैं; Linux पर ~/.local/share/misterdownloadmanager में, Mac पर ~/Library/Application Support/misterdownloadmanager में। एक पोर्टेबल कॉपी उन्हें इसके data फ़ोल्डर में रखती है। डाउनलोड की गई फ़ाइलें आपके डाउनलोड फ़ोल्डर में जाती हैं, प्रति श्रेणी एक फ़ोल्डर में क्रमबद्ध होती हैं; आप इसे विकल्प → इसमें सहेजें में बदल सकते हैं।
अगले चरण
मुफ़्त, ओपन सोर्स, कोई विज्ञापन नहीं, कोई ट्रायल नहीं।
Download GolinksPRO Download Manager